|
|
 |
In this series, I will not repeat the information that is already available on how superchargers work, but instead focus on their selection, installation, use and tuning on older engines. Here I will make various observations and comments on function, and in some cases how to make improvements. New material will be added regularly, and eventually better organized. Click below to jump directly to an individual topic. |
Supercharger Topics |
|
|
|
|
|
|
Function |
|
|
|
|
|
GMC supercharger manifold construction ideas
Although frequently used to supercharge V8 motors, none of these were originally made for this purpose. They were frequently original equipment on large diesel bus motors; “GMC” mean General Motors Coach division. |
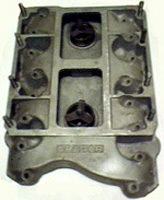
Intake manifolds to mount the GMC superchargers on common V8 motors were made for many popular engines, including 394 Oldsmobile, Pontiac, Buick nail-head, Ford FE, Chrysler RB, Chevrolet 409, Chrysler hemi as shown right; click for a larger view, etc., but most are no longer available. Other motors were never used enough to make such a product commercially practical. How to make your own intake manifold is the subject of this commentary. |
|
|
Top-mount is the most common method, but not the only one - front drive was also used (Potvin), but I will limit my remarks to installations where the supercharger case will attach directly to the top surface of a common intake manifold. |
Source
Custom manifolds (usually made from dual-quad intakes) are available, but the prices are painful ($800 & up). There's no technology involved (as you already know if you've looked inside a blower case), the price is simply based on “you need it, and I have it”, and the labor involved. There isn’t even any reason to weld it. |
|
|
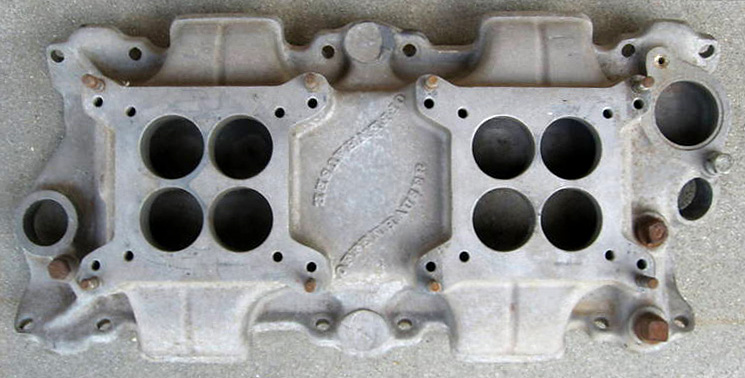
An aluminum manifold is best, since it saves weight and makes welding (if you wish) and machining easier. Any aftermarket manifold is a good start; the Offenhauser 360° (a Chevrolet small block Offenhauser is shown here, click on the picture for a larger view) or Weiand single plane types are the most frequent choice (rather than the dual-plane 180°, such as Edelbrock and some Weiand). A dual-quad manifold is best, since the area where mixture will enter the manifold is longer than a single carburetor opening. Even a factory 2 × 4 iron manifold such as the factory piece for the Chrysler 300 hemi, 383 or 413, &c. is a suitable candidate if the price is right.
The core of the adaptation is an adapter or transition plate, which forms a mounting base for the supercharger case, and is in turn attached (bolted or welded) to the intake manifold’s upper surface. The top surface of the adapter plate has (an) opening(s) to accept the discharge from the supercharger rotors (generally one or two large rectangles). The intake manifold’s carburetor openings are ported out in the center to form two large square openings. |
Position
The supercharger’s position in relation to its drive mechanism must be sorted out before the remaining parts are fabricated. The supercharger rotor axis must be absolutely parallel to the crankshaft, both lengthwise and laterally.
The carburetor mounting flange on the manifold is probably parallel to the crankshaft laterally, but frequently is machined at a slight angle |
|
|
lengthwise (higher in the rear) to make the carburetor horizontal when the engine tilts down in the rear. Minor adjustments may be made later with thin shims.
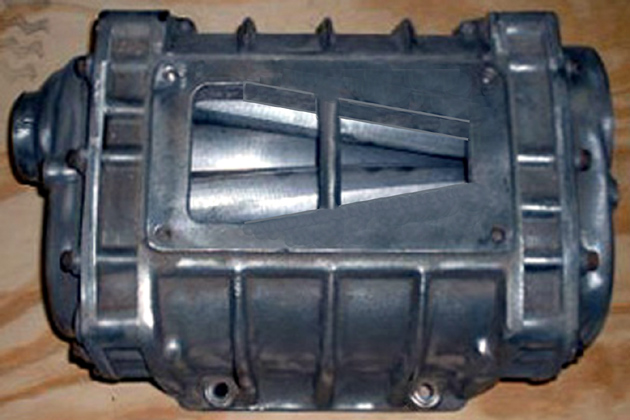
When this has been established, the supercharger may be “clocked” (rotated) around its drive axis to place its inlet or discharge ports in the most favorable position. This may not be centered front to rear in the manifold’s original carburetor pad. On a B&M, Weiand and some GMC with straight (non-helix) rotors, the charge more or less follows the original point of entry and will exit straight down. However, all the modern GMC and replica (Littlefield, Mooneyham, Kobelco) helixed rotor types move the entire charge to the forward end of the case, and the more developed ones have shielded (pie-slice) exhaust ports. This means that the “working area” of the exhaust port should be above the carburetor pad, which moves the supercharger back on the engine. Shown here is a 4-71 masked with a fabricated plate to reveal only the working area, click for a larger image.
All of them tend to centrifuge large droplets of fuel out of suspension, which delivers the mixture in waves with a cloud of droplets at the trailing edge as the rotors present to the port, rather than homogeneous mixture. Whichever cylinder is on intake at the critical point gets more fuel (although this probably balances out every few milliseconds).
The nose length of the blower drive on the supercharger’s front end plate will determine the fore & aft or left to right position of the case on the engine. There are different length nose extensions to position the pulley at different distances from the front cover plate, available in increments of about 1 from Weiand, Dyer, BDS, Mooneyham, TBS, &c. The drive pulley on the supercharger end plate must line up with the pulley on the crankshaft, no matter what. Try to find a nose assembly and extension that will position your discharge pattern where you need it. |
Adapter Plate Dimensions
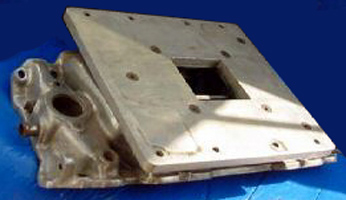
For a supercharger such as Eaton with a flat rectangular discharge surface, an adapter plate must be large enough to cover and seal the original port, and should support all mounting points of the super-charger; this is much larger than the engine’s intake manifold; shown right is a fabicated plate on an adapted manifold. Note that all Eatons are helix-rotor types, and the prior comments as to placement apply. |
|
|
The thickness of the adapter plate should be enough for beam strength so that it won’t “bow” or flex under tension. Steel will work but will be very heavy. Aluminum 6061 would be my choice - it’s weldable, machinable, and easy to find. I‘d try 1/2” thick; this need not be made of a single thickness, a “sandwich” of two thinner plates is just as effective and may be cheaper.
This is thick enough to counter-sink nuts going on the studs from the original manifold to create a flush upper surface. You could begin with the original 8 carb studs (unless they way inboard of the blower discharge), or drill and tap the upper manifold surface for larger 3/8-16NC studs.
You have to figure out what shape (roughly rectangular) will be a compromise between the entire blower discharge and a hole cut out of the original 2 × 4 pattern. If the blower is bigger, you may get better results from a thicker plate (or 2 plates) to use the thickness as a transition.
Look at other blower manifolds for the same blower type - see where they put their discharge vs. intake area.
When you know where to position it, tap the plate 3/8-16 for 8 studs (6-71 &c.) in the blower base pattern (or whatever size will fit). If the measurement isn’t perfect, slot the holes a bit to give you some room to slide the plate around.
I don’t think the plate needs to be bigger than 15” × 12”. This size 1” thick will cost about $45.00 cut to your size, and weigh about 18 lbs. plus packaging. The final weight will be less, with 1/5 to 1/4 removed for the discharge openings &c., leaving between 14 - 15 lbs. Additional weight can be removed with an end mill or a large drill by scalloping away un-necessary material between the bolt holes, ventilating empty non-structural areas, &c.
To improve the efficiency of the manifold, put a generous radius (3/8” or more) on the edge of the opening in the bottom of the adapter plate if it’s smaller than the intake manifold opening. |
See these Victory Library booklets |

|

|

|

|

|

|

|

|

|

|

|
|